Build a high-end PC: a Software Engineer's view
I’ve been a 8-year macOS user and often want to bring something new into my daily workflow - and now it’s time. Here are the main ideas I followed and the hardware components I decided to go with after a quick 3-day research.
I will use a bullet-point style to explain what I learned and some caveats to pay attention to. Building a PC is a very personal endeavor - and that’s the beauty of it. The components that I chose may not fit you the best for your applications. But it would be perfect if the article gives you some inspirations and a sense of the direction to go.
Main Ideas
-
Use the latest generation, #1/#2-ranked components to build a high-end, consumer-grade desktop.
- Use components from the same brand as much as possible for the best compatibility and to save yourself a headache in the future. Here we use components from Asus and Corsair.
- Prioritize on software support when deciding among components with similar level of hardware reliability and performance. Ever meet someone having a difficult time switching back to Windows after migrating to macOS & iOS? I think that’s one of the lessons from this story.
Most DIY enthusiasts prefer older-generation products because they’re much more cost-effective - they’re totally right, but here we’re looking at the build from a slightly different perspective. Latest technologies from the industry are only packed in the latest-generation products - we’re surely interested in playing around and exploring them as tech guys ourselves, aren’t we?
Components List
I selected the hardware components in the order I explained them below - hope it helps as a guide or a starting point for your own checklist.
CPU
Intel Core i9-9900K: Coffee Lake 8-Core, 16-Thread, 3.6 GHz (5.0 GHz Turbo)
Model: BX80684I99900K, SKU: 6302019
- Choose between Intel and AMD.
- AMD used to dominate the low-/mid-end market but now they’re taking a spot in the high-end as well. AMD CPUs have more cores but less single-thread performance than the same-tier Intel model.
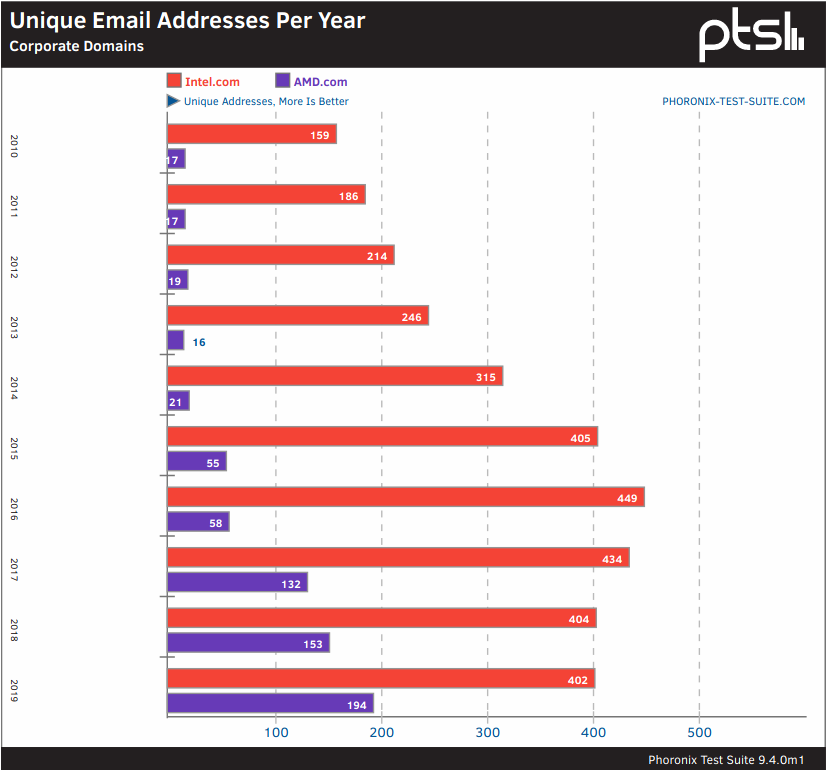
- Intel CPUs have been dominating the industry for a long, long time, especially in enterprises/workstations/servers (try randomly spin up an AWS/Google Cloud/Azure compute instance, type
lscpuand see). Intel and AMD both use thex86_64instruction set, so programs don’t need to be re-compiled to run on the other platform. However, many enterprise tools and frameworks are built for Intel CPUs and still have better compatibility & performance on them. For example, those compiled with the Intel compiler may run very slowly on AMD CPUs (which may be intentional). - Do you plan to use Linux natively and open-source software? There’re much more Intel employees working on the Linux kernel development than AMD employees (article). This may imply Intel’s heavier focus on the Linux compatibility/experience. Meanwhile, do note that some Intel drivers (and Nivida drivers, as discussed later in Graphics Cards) are closed-source. The open-source software for AMD seems to have better performance and less problem.
- Any particular hardware features you need that are only available on one platform? For example, (up to now) only motherboards with Intel CPUs support Thunderbolt 3 and only those with AMD CPUs support PCIe 4.
- Official guide on understanding Intel CPU’s model numbers 1 and 2. Some Interesting high-end models that worth a look:
- AMD Ryzen 9 3950X, 3900X
- Intel Core i9 9900KS, 9900KF
- Intel Core i9 10980XE
- Do you prioritize on single-thread performance or the number of cores? (Hint: it’s a tradeoff - processors that are better in one will be not as good in the other)
- This can be the most impactful decision you make in the build process. Let’s think it carefully, because (1) it’s one of the few decisions where spending more money doesn’t necessarily get you a better product (regarding to your application), (2) it limits the choices of the motherboard, which determines the expandability/scalability of the machine. Below are some typical choices where the first has better single-thread performance and the second has more cores.
- Intel VS. AMD
- Regular 9th-Gen Intel Core i9 VS. Intel Core X-Series (Ex. Intel Core i9 9900K VS. Intel Core i9-10980XE): consumer-grade CPU VS. HEDT (High-end Desktop) CPU
- Intel Core VS. Intel Xeon: workstation CPU (a more extreme product of a large number of cores but low single-core performance)
- It’s very hard for a program to effectively use multiple cores.
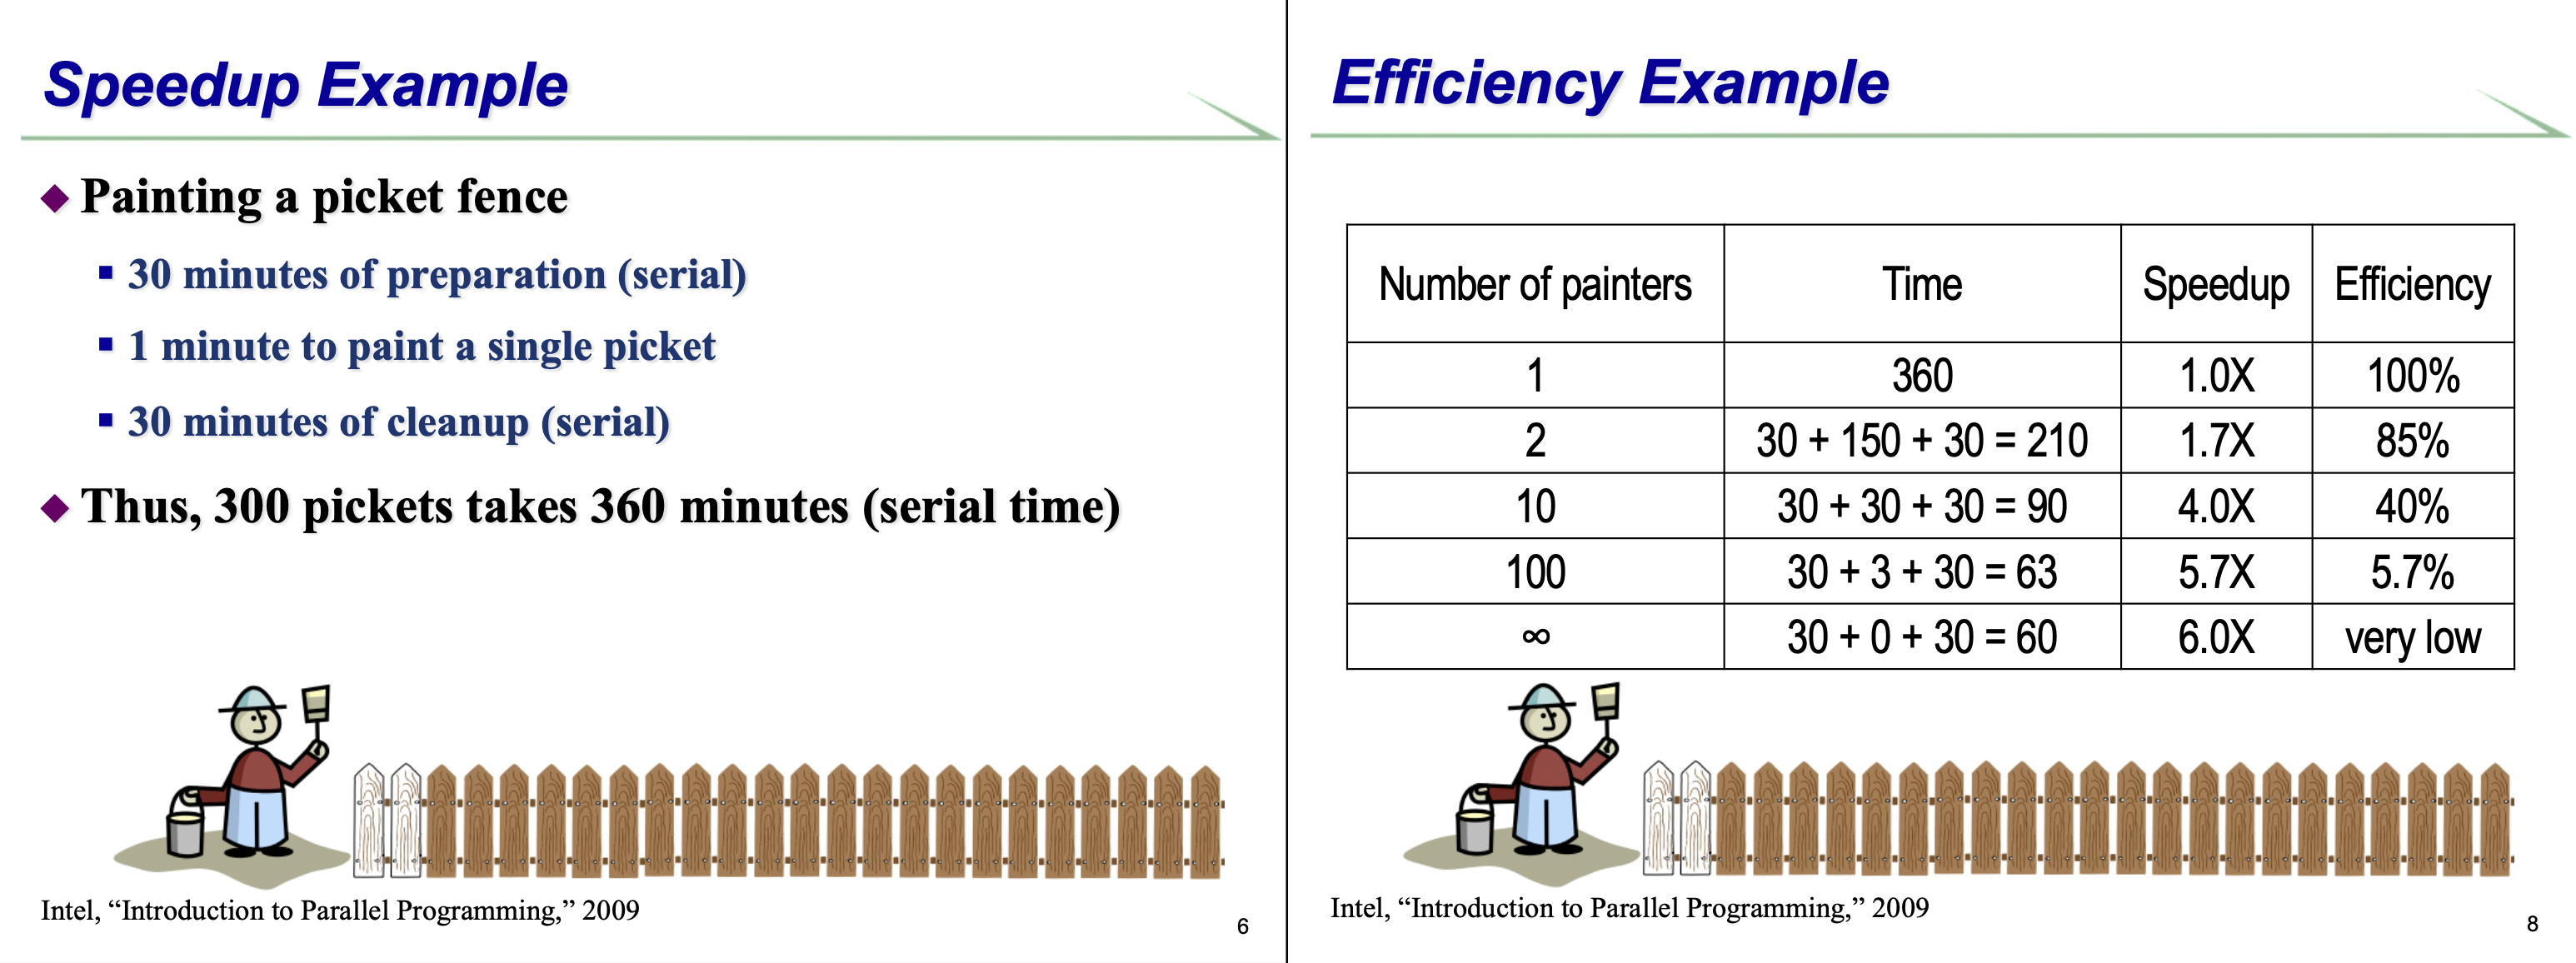
- Take a look at an intuitive example below of painting a picket fence. Performing a computation is just like painting a fence - some part can only be done by 1 painter. Increasing the number of painters only accelerates the portion that can be performed by multiple painters. Here a painter corresponds to a thread running on a core and the number of painters correspond to the number of cores available. Serial sections of a program refer to those that can only be computed by one thread, and Parallel sections can be computed by multiple threads running on multiple cores together. Programs are rarely perfectly parallelizable - at least some parts, or even most parts for many professional software, are serial.
- Back in the old days when the CPU’s single-core performance has not hit the ceiling, programs are not really architected in a way to take advantage of multiple cores. It’s only in the recent few years that parallel computing begins to take off, and software companies start trying to optimize the apps to make computation parallel. But this is not an easy task since the legacy architecture is already there for a long time and not easy to change. It will take time.
- That being said, some programs do a better job on this than the other due to its nature of computation. For example,
- Adobe Photoshop can rarely use more than 1 core, Adobe Lightroom Classic is getting better, and Adobe Premiere Pro & other video-editing software are good at using all cores.
- Workstation and server apps are usually more parallelizable. For example, web servers respond to thousands of user requests simultaneously. Every request is handled independently on a separate thread so the process is perfectly parallelizable across all cores.
- Games usually use very few cores and run best on CPUs with high single-core performance.
- Even for programs that can effectively use multiple cores, adding more cores does not necessarily improve the experience in all parts of this app. Take Adobe Lightroom Classic for example: exporting and applying presets in batch use many cores but most other operations, such as scrolling through the library/pictures and real-time development on a single picture, are still single-threaded. If you prioritize on experiences of interacting with the software and don’t mind spending an extra 30 seconds when exporting 1000 pictures, it’s still a better idea to focus on single-thread performance.
- Adding in more cores shows a diminishing rate of return. For example, exporting videos in Adobe Premiere Pro achieves close to peak performance on 8 cores. There’s very little improvement on performance when more cores are added. The Efficiency column in the above painting fence example demonstrates the same thing.

- Take a look at an intuitive example below of painting a picket fence. Performing a computation is just like painting a fence - some part can only be done by 1 painter. Increasing the number of painters only accelerates the portion that can be performed by multiple painters. Here a painter corresponds to a thread running on a core and the number of painters correspond to the number of cores available. Serial sections of a program refer to those that can only be computed by one thread, and Parallel sections can be computed by multiple threads running on multiple cores together. Programs are rarely perfectly parallelizable - at least some parts, or even most parts for many professional software, are serial.
- This can be the most impactful decision you make in the build process. Let’s think it carefully, because (1) it’s one of the few decisions where spending more money doesn’t necessarily get you a better product (regarding to your application), (2) it limits the choices of the motherboard, which determines the expandability/scalability of the machine. Below are some typical choices where the first has better single-thread performance and the second has more cores.
- How much expandability do you need on the motherboard? Refer to the motherboard section.
- Then, go to a benchmark site to find performance ranking of all CPUs on the market or performance data of a CPU model.
- Passmark
- High-end CPUs Multi-core Performance Ranking
- CPUs Single-thread Ranking
- Search for a particular CPU model, and pay attention to “Single Thread Rating” and “Average CPU Mark”
- CPU Hierarchy 2020 by Tom’s Hardware
- UserBenchmark: getting a sense of each model’s market share
- Articles on Puget Systems: great hardware benchmarks on photography & video editing applications. Make sure to read their latest articles as optimizations of apps are getting better and better over the years.
- Wikichip: technical specs for a CPU, used to select a compatible motherboard
- Passmark
Motherboard
ASUS ROG Maximus XI Hero (Wi-Fi) Z390 Gaming Motherboard
-
Choose a size: Extended ATX (eATX), ATX, micro-ATX (mATX), and mini-ITX
- ATX (full-sized) motherboards offer the best expandability and is still commonly used compared to eATX.
-
Choose a brand.
- 3 classical high-end motherboard brands with excellent build quality: Asus, Gigabyte, MSI
- Among these three brands, Asus and Gigabyte have slightly higher reliability where MSI is acclaimed for being relatively cost-effective. Gigabyte has produced some entry-level products but some people think their high-end boards are even slightly more reliable than Asus’. Asus has the best UEFI and supporting software among the three brands.
-
Choose a model series in the selected brand. Below are the series of some motherboard brands ranked from premium-level to entry-level. The difference is mostly on build quality: the VRM, for example. Higher quality components make it easier to overclock the CPU to higher frequency, and of course, offer better reliability.
- Asus: Republic of Gamers (ROG), Prime, The Ultimate Force (TUF)
- Gigabyte: AORUS, …
-
Filter the models with the CPU’s Socket and the corresponding Chipset. Only those motherboards work with this CPU - in this sense, the decision of CPU and motherboard are tied together and may influence each other.
-
The above CPU has Socket LGA 1151 and works with the Intel Z390 chipset.
-
Intel chipset series ranked from premium-level to entry-level: X > Z > H > B. Let’s focus on the X and Z chipsets for this build.
- Two examples of CPU-chipset-motherboard combination:
- Intel Core i9-9900K CPU, Socket LGA 1151, Intel Z390 chipset, Asus ROG Maximus XI Hero motherboard
- Intel Core i9-10980XE CPU, Socket LGA 2066, Intel X299 chipset, Asus ROG Rampage VI Extreme Encore motherboard
-
Motherboards with the X chipset usually have better expandability as it’s paired with Intel Core X-series HEDT CPUs, compared to those with the Z chipset paired with the regular Intel Core CPUs. They both support CPU overclocking. As an example:
Asus ROG Maximus XI Hero Asus ROG Rampage VI Extreme Encore Number of PCIe links and bandwidth of each CPU: 2 PCIe 3.0 x16
Chipset: 1 PCIe 3.0 x16, 3 PCIe 3.0 x1CPU: 3 PCIe 3.0 x16
Chipset: 1 PCIe 3.0 x4Memory type and capacity Dual-channel, 4 RAM slots with 128 GB maximum memory Quad-channel, 8 RAM slots with 256 GB maximum memory Number of SATA ports 6 8 - While aiming to maximize expandability, don’t forget the choice of the motherboard is tied to the choice of the CPU. Upgrading from the Z chipset to the X chipset means choosing a HEDT CPU with not-as-good single-thread performance, thus a slightly worse user experience in daily desktop applications. This upgrade makes complete sense when building a dedicated workstation for 3D rendering or exporting videos but nothing else: the HEDT CPU is more suitable for the work and more expansion slots are necessary to connect the peripherals. But if we use the machine as a general-purpose desktop to run a diverse set of applications, spending at least $500 more on this CPU and motherboard may actually feel like a downgrade.
-
-
Decide on a model. Some Asus motherboards that we’ve looked into:
- Asus Prime Z390-A VS. VS. Asus ROG Strix Z390-E Gaming VS. Asus ROG Maximus
- Asus ROG Maximus XI Code/Formula/Hero
Graphics Card
ASUS ROG STRIX GeForce RTX 2080 SUPER Advanced Overclocked 8G GDDR6
Model: ROG-STRIX-RTX2080S-A8G-GAMING
- First of all, think of the GPU as a domain-specific compute chip/accelerator. It only does a few things compared to the general-purpose CPU, but much faster.
- Given the domain specialty, not many application can be accelerated by the GPU. In fact, most apps that are frequently associated with graphics aren’t getting much of a performance boost by a dedicated GPU (at least for now - the companies are working towards the optimization). Also, programming on GPU follows a very different pattern from our regular development of programs running on CPU. (If you’re curious, try writing a program in OpenCL that calculates matrix multiplication on GPU and uses all the GPU’s cores.) There’s a bit of a learning curve there, so we expect it will take some time to implement the GPU optimizations on these apps.
- Puget System have great benchmarks on the GPU performance of Adobe’s apps.
- Games can usually utilize GPU pretty well, so gamers tend to prioritize on it to greatly improve the gaming experience.
- Choose between Nvidia and AMD.
-
Nvidia’s CUDA platform and programming model are becoming an industry standard in high-intensity computing, photography & video-editing and gaming. (let’s try the same thing as when choosing a CPU: spinning up a GPU instance on any cloud provider and check its hardware.)
-
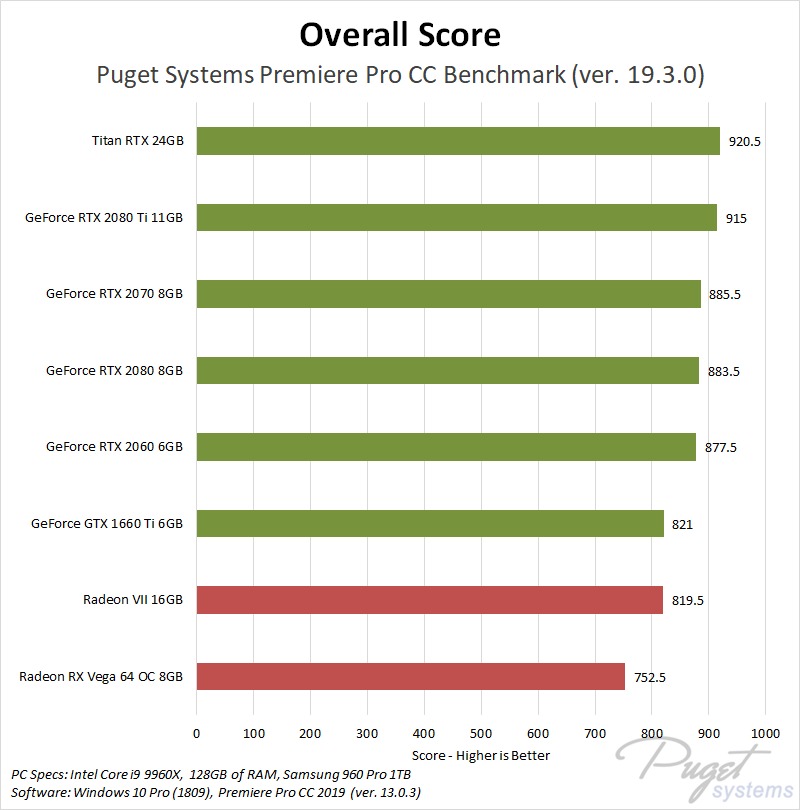
Benchmarks show many professional apps (Ex. Adobe Premiere Pro, Adobe Photoshop CC) have better performance on Nvidia GPUs than on the same-tier AMD GPUs due to better software optimization. Check out Puget Systems for more details. So unless there’s any special requirement or compatibility issue, Nvidia would be the preferable choice. Below is a benchmark result of different GPU’s performances on Adobe Premiere Pro.
-
- Go to a benchmark site to find performance ranking of all GPUs on the market and find one that best suits your need.
- GPU Hierarchy by Tom’s Hardware
- An example of latest-generation Nvidia GPUs: Nvidia Titan RTX, Nvidia RTX 2080 Ti, Nvidia RTX 2080 Super
- Pay attention to distinguish between a GPU and a Graphics Card. GPU is only one part - the most important part - of a graphics card (think of it as a “GPU chip”). Besides this chip, the Graphics Card also contains dedicated memory, a “motherboard” with data transmission links between the GPU and memory, etc. Nvidia and AMD are the only two major companies that manufacture GPU. They manufacture Graphics Cards themselves, but also authorize the use of these GPUs to a large number of other hardware companies. All these companies can then attach the other components and manufacturer the entire graphics card. Thus, we need to choose a particular model of the Graphics Card from a brand.
- The three high-end motherboard brands all manufacture premium-level Nvidia graphics cards, so we’re sticking with the brand of our motherboard for best software compatibility. Some models to consider as an example:
- Gigabyte AORUS GeForce RTX 2080 SUPER 8G
- Since the third party-companies have the flexibility to choose parts in the graphics card, these cards can either be an upgrade or a downgrade of the Nivida-manufactured card. The cards from the above brands are mostly an upgrade. These upgrades include:
- Increasing the number of fans from 2 to 3
- Run the GPU at a slightly higher base frequency
- Support GPU overclocking to higher frequencies due to high-quality components and better cooling
- Each company may manufacture multiple graphics card using the same GPU and different components. For example:
- Asus ROG Strix RTX2080S A8G Gaming VS. Asus Dual RTX2080S O8G Evo V2
- Decide if you want to add liquid cooling to the Graphics Card. This may be worth considering if the GPU will be running at high load for a prolonged period of time. But again, keep the idea of its “domain specialty” in mind when building a general-purpose desktop. Cards with a liquid cooling system include:
- Gigabyte AORUS GeForce RTX 2080 WATERFORCE 8G
- The three high-end motherboard brands all manufacture premium-level Nvidia graphics cards, so we’re sticking with the brand of our motherboard for best software compatibility. Some models to consider as an example:
Memory
Corsair Vengeance RGB Pro 64GB (2 x 32GB) 288-Pin DDR4 SDRAM DDR4 3200 (PC4 25600) Desktop Memory
Model: CMW64GX4M2E3200C16
Corsair Vengeance RGB Pro 32GB (2 x 16GB) 288-Pin DDR4 SDRAM DDR4 3200 (PC4 25600) Desktop Memory
Model: CMW32GX4M2C3200C16
-
Decide the total RAM size. This can be based on your observation on how your current system runs, to see how much upgrade you need.
- RAM size is the performance bottleneck of my current laptop. With the available 16 GB RAM, there’re frequently more than 8 GB of swap used under a light load.
- Many applications that we’ll be using are very memory-intensive, including stitching panoramic pictures in Adobe Photoshop from RAW-format images (which easily takes tens of Gigs of RAM) and running multiple virtual machines. So we decide to give it a jump to a total of 96 GB.
-
When deciding the number of RAM modules to reach this capacity, make sure to fully utilize the memory bandwidth available on the motherboard.
- As an example, the system will run faster with two 8 GB RAM sticks than with one 16 GB RAM stick. The total memory bandwidth doubles by occupying the two slots available in each channel - the idea is similar to RAID-0 in hard drives. Thus, it’s ideal to use 2 or 4 RAM sticks in a Dual-Channel memory system, and 2, 4, 6 or 8 RAM sticks in a Quad-Channel memory system.
- The two RAM modules in the same channel should better be the exact same model for optimal performance.
-
Pay attention to the maximum RAM supported by the CPU and the motherboard.
- Our CPU supports a maximum of 128 GB RAM, but the motherboard may support at most 64 GB (4 * 16 GB) without a UEFI firmware update.
- To make things easier, we decide to go with two 16 GB RAM modules and two 32 GB modules. First plug in the two 16 GB sticks to install the OS, update the motherboard’s firmware, and then install the remaining two 32 GB sticks.
-
Choose a brand for your RAM modules.
- Kingston and Corsair seem to be premium choices with excellent reliability. Here we go with Corsair as it provides higher maximum frequency and better overclocking support.
-
Look at the hardware spec of a RAM module and find the desired model number.
-
DDR4 SDRAM: the 4-th generation “Double Data Rate Synchronous Dynamic Random-Access Memory”. Check the motherboard’s spec to decide which generation of DDR RAM to use - it should be DDR4 which is the latest standard.
-
Frequency: the maximum clock speed of the RAM. The DDR4 standard specifies multiple standard frequencies: 1600, 1866, 2133, 2400, 2666, 2933, 3200 MHz. The motherboard could potentially support a maximum frequency higher than 3200 MHz though (Ex. 4400 MHz on the Asus ROG Maximus XI Hero Wi-Fi board) - this higher frequency can be achieved by overclocking.
-
Timing and CAS Latency: each RAM module has a Timing specification represented by 4 numbers, with a detailed description here. CAS Latency refers to the first number. It can be roughly understood as the number of clock cycles between a data request is issued to the RAM and the data is returned to the CPU.
-
Below are the spec of some Corsair RAM modules that we’ve considered:
Model Number Frequency Timing CMK64GX4M2C3000C15 3000 (PC4 24000) 15-17-17-35 CMW64GX4M2A2666C16 2666 (PC4 21300) 16-18-18-35 CMW64GX4M2D3000C16 3000 (PC4 24000) 16-20-20-38 CMW64GX4M2E3200C16 3200 (PC4 25600) 16-20-20-38 CMW32GX4M2C3200C16 3200 (PC4 25600) 16-18-18-36 CMW32GX4M2E3200C16 3200 (PC4 25600) 16-20-20-38 CMW32GX4M2Z3200C16 3200 (PC4 25600) 16-18-18-36 Note that the RAM’s data access latency can be best measured with Frequency divided by CAS Latency - that is, the number of data accesses per second. After doing the calculation, we see that this metric is actually very similar among all the modules above, though they appear to have very different frequencies.
-
Thus, we use the following strategy to find the desired model.
- Browse available models with a relatively low LAS latency, such as 15 and 16. To achieve the same performance, a low latency is slightly better than a high frequency in my opinion, because overclocking to such a high frequency may result in a less reliable system. Among those modules, find one that supports relatively high maximum frequency, such as 3200 MHz.
- Aim to find other RAM modules to support the same frequency and have the same LAS Timing for best performance in the system.
-
Storage: Solid State Drive
Samsung 970 Evo Plus 2 TB Internal Solid State Drive (SSD)
Model: MZ-V7S2T0B/AM
-
Decide on the total storage space.
- Keep in mind of the wear-out problem unique in SSD compared to mechanical HDDs. Manufacturers have implemented “wear leveling” approaches that write to every block in the SSD sequentially for all data writes to ensure an even level of wear of all blocks. This idea is similar to the Log-structured file system but on a hardware level. Assume every block wears out after a certain number of writes; given the user stores the same total amount of data, a larger SSD actually has a longer lifespan because there’re more blocks to be re-used.
- Don’t worry about this problem though unless you’re planning to use the drive heavily 24/7 such as in a datacenter. Modern SSDs have lifespans so long that they’re not concerning to regular users at all.
-
Choose between SATA drives and NVMe M.2 drives.
- The SATA interface has been around for a long time. You probably won’t even know there’s another choice if you’re a DIY PC veteran in the earlier days. Unfortunately the interface provides a maximum of ~600 MB/s data transfer speed on modern motherboards, which becomes a bottleneck for the SSD performance. After accounting for the overhead of the data transmission protocol, it’s often referred to as SATA 6Gb/s ports on motherboards’ specs (note the unit is bit here, not byte).
- M.2 drives that support the NVMe protocol are not limited in this sense, because the protocol supports a maximum of 3500 MB/s data transmission. They require support from the motherboard where most modern ones have, so this is almost always the choice to go.
-
Choose a brand.
- Samsung has been a lead in the SSD industry so we’ll go with that.
- Besides, Western Digital has some more cost-effective options with lower read/write speed. Drives with the Intel Optane technology are also worth looking into: they’re not exactly an SSD but more like a hybrid storage between a HDD and RAM. It requires motherboard support, is not really priced for consumers and mostly used in enterprise applications so far.
-
Look at the hardware specs of the brand’s different SSD models. Below are the two latest models of the Samsung M.2 SSD: the Samsung 970 Pro only has size up to 1 TB, so this size is used for comparison.
970 Evo Plus 1 TB 970 Pro 1 TB Storage Memory Samsung V-NAND 3-bit MLC Samsung V-NAND 2-bit MLC Cache Memory (not mentioned) 1GB Low Power DDR4 SDRAM Sequential Read 3,500 MB/s 3,500 MB/s Sequential Write 3,300 MB/s 2,700 MB/s Random Read (4KB QD32) 600,000 IOPS 500,000 IOPS Random Write (4KB QD32) 550,000 IOPS 500,000 IOPS Warranty/Lifetime 600 TBW 1,200 TBW - The 970 Evo Plus has higher read+write speed than the 970 Pro, including both sequential and random I/O. The 970 Pro has doubled lifetime compared to the 970 Evo Plus, so it’s more suitable for data center applications.
- Other benchmarks show that when a very large batch of data is written at once, the I/O performance on the 970 Evo Plus drops more rapidly than on the 970 Pro after the cache is saturated. This has something to do with the different storage memory type: the 2-bit MLC achieves faster sequential I/O while 3-bit MLC has faster random I/O.
-
Should I use 1 larger SSD or 2 smaller SSDs?
- Technically 2 smaller SSDs enable a RAID-0 configuration to double the bandwidth and improve I/O performance.
- However, one more component simply means one more risk of failure. The data will be lost if either drive fails. Also, the improvement on bandwidth may not be easily observable unless in very data-intensive applications, since the I/O performance of a single modern SSD is very high already.
- A single SSD brings more flexibility for partitions. For example, creating two 750 GB partitions and one 500 GB partition is easier on one 2 TB drive than two 1 TB drives. Of course we can create a logical volume across the two physical drives with the same result, but that’s just some more hassle.
Cooling System
Corsair Hydro Series, H115i RGB Platinum, 280mm, 2 x ML PRO 140mm RGB PWM Fans
Model: CW-9060038-WW
- Should I use air cooling or liquid cooling?
- Water is much better at absorbing heat than air due to its higher specific heat.
- Intel recommends a liquid cooling system for higher-end CPUs such as the Core i9-9900K. But the difference may not be that huge as we imagined: a high-end air cooling system can bring the CPU to a lower temperature than a mid-end liquid cooling system, according to some reviews on YouTube. The CPU is not running under full load most of the time anyways, so the cooling system usually doesn’t get the chance to exert its full power.
- Liquid cooling may have a slightly higher noise level.
- A liquid cooling system “wraps” the CPU so its heat is self-contained inside the cooler and not dissipated into the case. Other air-cooled components (such as the GPU) are then operating in a cooler environment. Thus, this cooling system for CPU indirectly helps the performance of those other parts. This is an interesting observation that we haven’t thought of in the first place.
- You can either purchase a complete liquid cooling system (closed-loop system) or build your own from scratch (open-loop system).
- The two systems look like the one on the left and on the right respectively (Image credit: Google Images and Corsair official website):
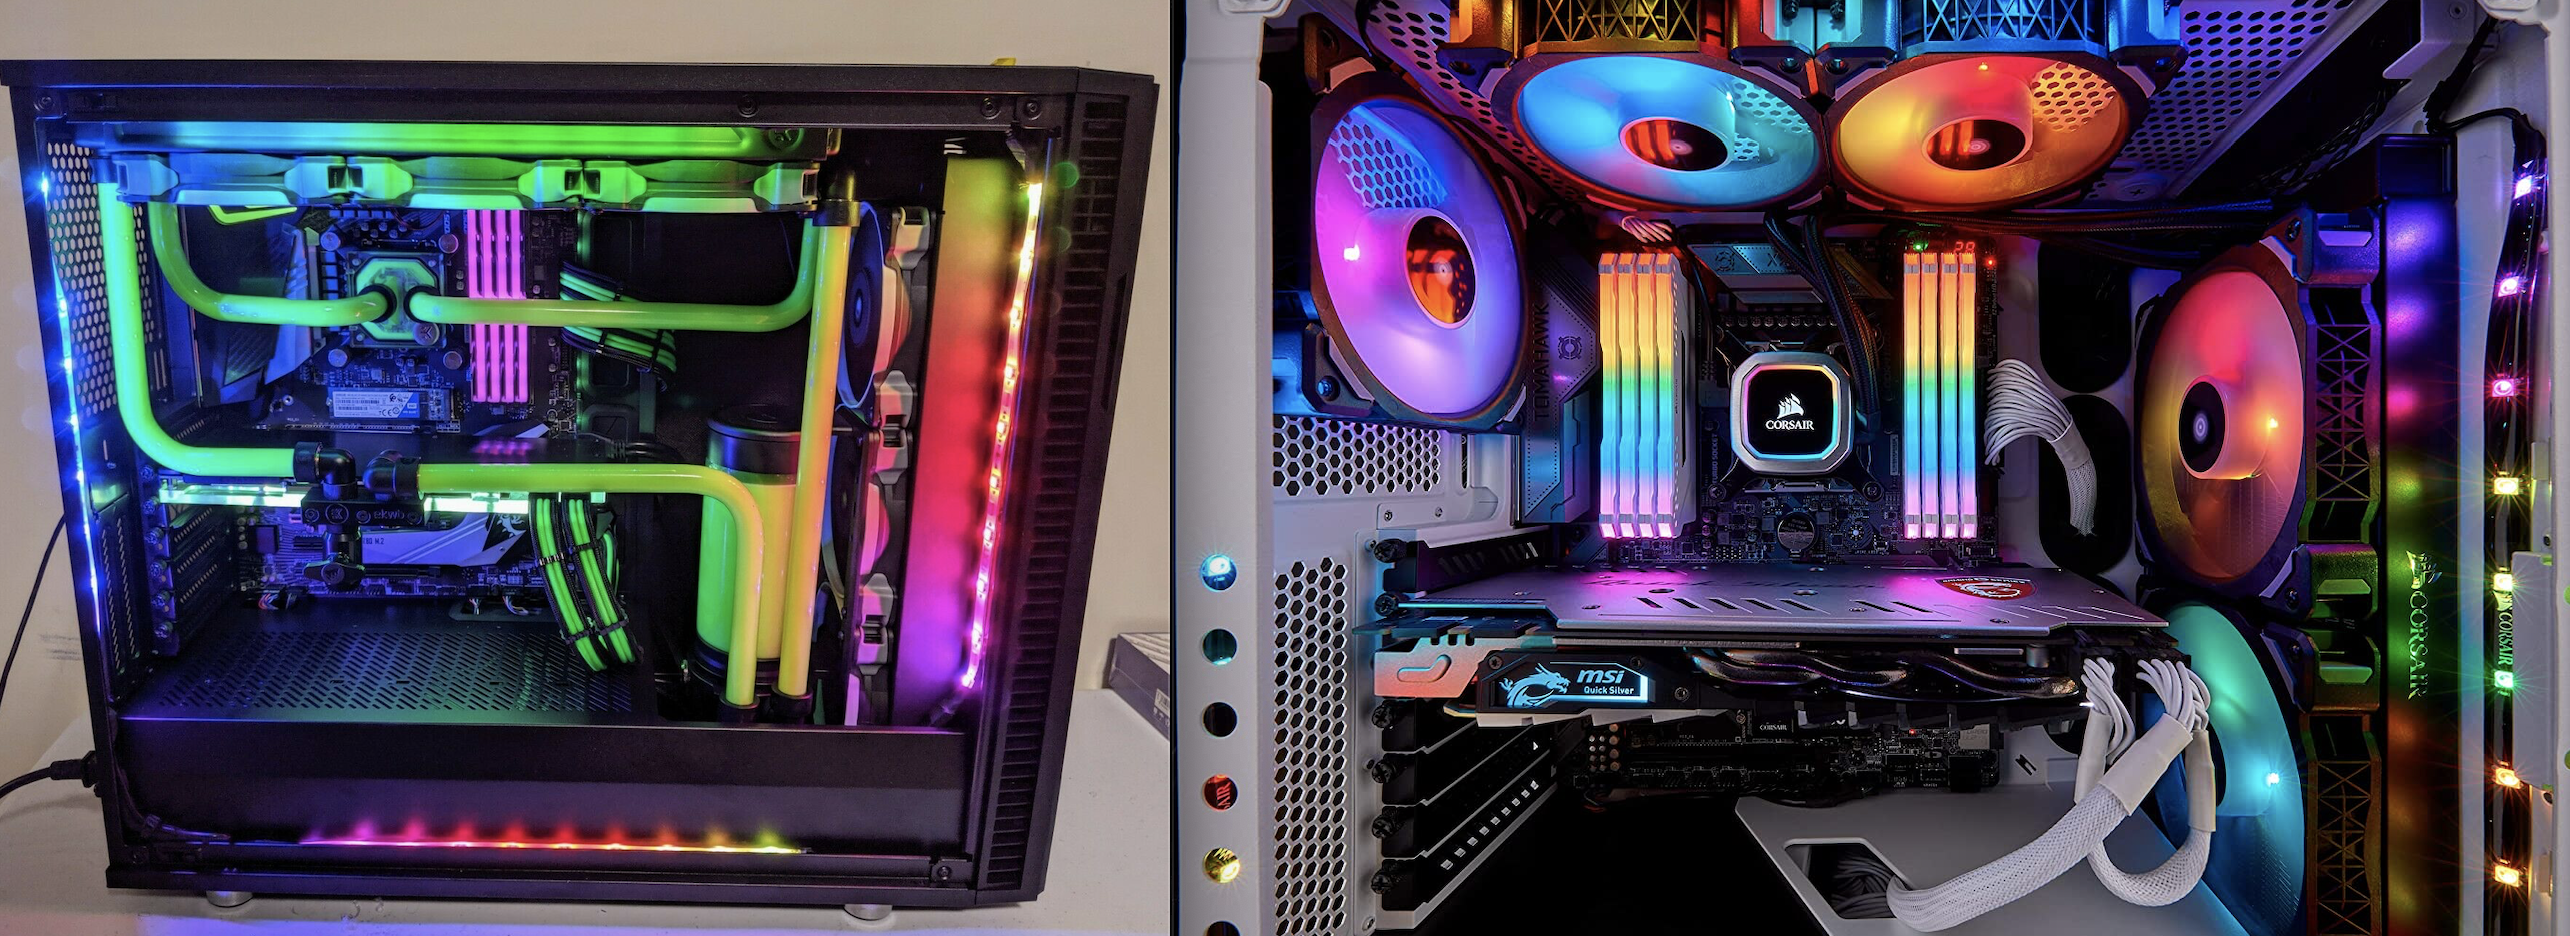
- Installing the pump, connecting the tubes and filling water requires careful testing. There could be risks of leaking water and damaging hardware due to imperfect installation. Commercial liquid cooling systems may provide warranty for all your hardware in case the water gets leaked, so we’re going with a closed-loop cooler for now.
- The two systems look like the one on the left and on the right respectively (Image credit: Google Images and Corsair official website):
- Select a model from a target brand. Some Corsair liquid cooling systems that we’ve considered:
- Hydro Series H100i RGB PLATINUM SE 240mm Liquid CPU Cooler
- iCUE H100i RGB PRO XT Liquid CPU Cooler
- Pay attention to the following parameters:
- Type of Fan blade: Ex. Corsair manufactures cooling system with 4+ types of blades, where ML is believed to be one of the most effective option (compared to LL, etc.).
Power Supply Unit (PSU)
Corsair HXi Series HX850i 850W 80 PLUS Platinum Full Modular ATX12V & EPS12V SLI with C-Link Monitoring and Control
Model: SKU CP-9020073-NA
- Determine maximum constant power output needed from the PSU. (note: not the peak power)
- First, determine the total power of all system components by a wattage calculator such as PC Part Picker or Newegg Power Supply Calculator. Our build is rated at about 527 Watt.
- This total power is best to be around 70% of the PSU’s maximum output, so that not too much pressure is put on the PSU and there will be room for future hardware upgrade. Our rule of thumb is to make sure the PSU can work with all current parts plus an additional graphics card of the same model. We decide to go with a 850W PSU.
- Pay attention to the following specs:
- 80-Plus Rating: a measure of the efficiency of power conversion. A PSU with a higher rating helps save energy and electricity bills.
- Number of 4-pin ATX power connectors: make sure the PSU has enough of those to plug into all available connectors on the motherboard. The system will have a higher demand of power when running on full load or being overclocked. PC Part Picker helps check this compatibility after you add all desired parts.
- Choose a model from the target brand:
- It can be useful to be able to monitor power draw from each component in real time. All Corsair PSUs ended with “i” in the model name support this functionality.
- Premium series of Corsair PSU ranked from good to best: RM (evolved from TX), HX, AX Series
Case
Corsair Obsidian Series 750D Black Brushed Aluminum and Steel ATX Full Tower Computer Case
Model: CC-9011035-WW
- Choose a size to fit your motherboard (using ATX as an example): Mid Tower VS. Full Tower
- Some RAM modules with a “shell” (such as the Corsair Vengeance RGB Pro) are higher than bare-bone RAM sticks, and may touch the two top case fans in a Mid Tower case. The top case fans may be a very tough fit or have to be installed in alternative locations. Overall the hardware would fit very tightly in such a case. Check out some YouTube videos on the size of the motherboard and the case to get a feel.
- A larger case provides more 5.25, 3.5 and 2.5-inch bays for better expandability, and it’s simply easier to work in due to more spaces. A smaller case is easier to be moved around. A fully-installed Full Tower case may require more than 1 person to carry around.
- Sample Sizes
- Mid Tower: 395mm x 210mm x 450mm (Corsair iCue 220T RGB)
- Full Tower: 560mm x 235mm x 546mm (Corsair Obsidian 750D Airflow Edition)
- Then, the selection becomes a very personal choice of style. Some popular Corsair cases that we’ve considered:
- Corsair iCue 220T
- Corsair Obsidian Series 750D Airflow Edition
- Corsair Obsidian 500D
- Corsair Crystal 570X
Case Fans
Top fans: 2 Noctua NF-A14 PWM
Front fans: (2 came with Case)
Back fan: (1 came with Case)
- First, design the airflow inside the case. Then decide if you need to buy additional fans besides those that come with the case, and how many if the answer is yes.
- Here is our first draft of the airflow design, with case fans in green squares and radiators in green circles. Cool air flows in the direction of blue arrows and warm air in the the direction of red arrows.

- Since the case comes with 2 fans on the front and 1 fan on the back, we plan to first add 2 additional fans on the top. 2 more fans on the bottom may be needed if more extreme workloads are introduced in the future.
- Here is our first draft of the airflow design, with case fans in green squares and radiators in green circles. Cool air flows in the direction of blue arrows and warm air in the the direction of red arrows.
- Specs to consider when selecting a case fan:
- Size of the fan: larger fans can spin slower to move the same volume of air, so it’s quieter than smaller fans. For example, either 3 120mm fans or 2 140mm fans can be installed on top of our case. We decide to go with the largest fan that can be installed on the case.
- Pressure-optimized VS. Airflow-optimized: CFM. An article from Noctua explains the concept pretty well.
- Choose a brand.
- Noctua produces not fancy-looking but one of the highest quality fans. We simply go with the Popular choices and recommendations listed on their website as a starting point.
Useful Resources
- PC Part Picker: flags out warnings of potential incompatibilities between selected components.
Happy Building!